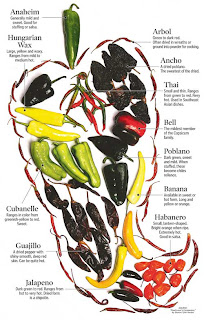
This goes with so many things, cheese and crackers, a boost for sandwiches, a glaze for meat of all kinds or the heat in a marinade or BBQ sauce. This is another recipe that was not part of my family's tradition but something I picked up here in the city. I make it every year and give a lot away as gifts to friends and colleagues. There are a million variations of this but the following recipe is the one I like best.
Hot Pepper Jelly
Ingredients
1 portion apple stock-3 cups-refer to master recipe
½ cup chilies – whatever your favourites are in any combination
3 cups sugar
2 tablespoons lemon juice, strained
Directions
Seed the chilies. You leave the white membranes; they provide some of the heat. Finely chop, you want to have a ½ cup of chili pieces. Tie all or some of the seeds in a small piece of cheesecloth, this provides a lot of heat.*
In a heavy bottomed stock pot, add chili pieces and the cheesecloth bag of seeds to the apple stock and bring to a boil. Add the sugar, ½ - 1 cup at a time and bring back to a boil in between each addition. Stir until each addition of sugar is dissolved as well. After all the sugar is added bring the mixture to the gel point, it takes about 15-20 minutes. The gel point is 8 degrees Fahrenheit above boiling or 220 degrees. I don’t know the conversion for Celsius off the top of my head. Maintain the boil for a minute after you reach the gel point.
Point of contention here I will explain after the recipe. **
Skim the jelly and ladle into sterile jars. Cover with lid and screw bands to finger tip tightness.***
Process for 10 minutes in a boiling water bath. Remove and let cool.
Yield is about 5-250 ml jars.
* I crush the seeds with a mortar and pestle before I tie them in cheesecloth. It is entirely up to you to add it or not, it depends on how hot you want things to be. I also press the bag against the sides of the stockpot while cooking to release maximum heat from the peppers I use.
** The point of contention is how to distribute the pieces of pepper through your jelly and they are diametrically opposed. One says to let the jelly sit for ten minutes or so stirring occasionally before it goes in the jar. The other says to tilt the jars after processing to distribute the pieces. Both claim the other method can break the gel. Personally, I have used both and don't find either all that effective. Neither affect the taste and I don't really sweat the appearance that much so.....
*** More detailed canning instructions are part of the apple butter recipe. I'll have to do a whole post before spring.
As I mentioned in the master recipes, I strain and strain again, as many as six times before the finished product. It is excessive but there is a point to my obsession. It makes the final product beautifully clear. It also means a lot less skimming, where the clumsy factor kicks in. I have enough singed fingers and knuckles with out prolonging the experience.
You need to have a fairly large pot for this as well, the recommendation is four times the volume of the recipe you are making. I just went out and bought a huge one, well three actually, so I don't have to worry about any of my recipes boiling over. As the jelly cooks it will occasionally boil up so you don't want it to over flow.
Try and add the sugar in the center of the pot. You want to avoid sugar crystals on the sides of the pot that can scorch and add either an unwanted taste or colour or both.
You can use this right after it cools but it is better if it has a bit of a chance to sit and develop a little, about a week. Still lots of time to get a batch done before all those Christmas parties.
That is all I can think to tell you to help ensure success with this recipe. If you have any questions feel free to leave a comment and I'll help as much as I can. As always, good luck and enjoy.


Mmmmm... hot pepper jelly on top of cream cheese and crackers. Appetizer yumminess! Thanks for the recipe!
ReplyDeleteThis is probably the most popular thing I make. My grandmother loves the stuff.
Delete